Difference between revisions of "GMCP CMUD Tutorial"
| (One intermediate revision by the same user not shown) | |||
| Line 1: | Line 1: | ||
== Enabling GMCP == | == Enabling GMCP == | ||
| − | In CMUD you can enable GMCP via the preferences for your session. | + | In CMUD you can enable [[GMCP]] via the preferences for your session. |
Once a session is opened, open the preferences: | Once a session is opened, open the preferences: | ||
| Line 10: | Line 10: | ||
== Receiving a GMCP message == | == Receiving a GMCP message == | ||
| − | Once GMCP is enabled, the MUD will begin | + | Once GMCP is enabled, the MUD will begin sending GMCP messages. |
| − | |||
| + | There are two types of GMCP messages, broadcasts and requested messages. | ||
| + | Broadcast messages will happen automatically, while requested messages will only be sent by the MUD if the client requests them. | ||
| + | The full list of packages and their message types can be found [[GMCP Packages|here]]. | ||
| + | |||
| + | CMUD automatically saves all data from GMCP messages in a global <code>%gmcp</code> variable. | ||
For example, if you wanted to read the area name from the prompt, you can do this at any time, from anywhere via the following zScript: | For example, if you wanted to read the area name from the prompt, you can do this at any time, from anywhere via the following zScript: | ||
%gmcp.char.prompt.an | %gmcp.char.prompt.an | ||
Latest revision as of 08:59, 7 January 2021
Enabling GMCP[edit]
In CMUD you can enable GMCP via the preferences for your session. Once a session is opened, open the preferences:
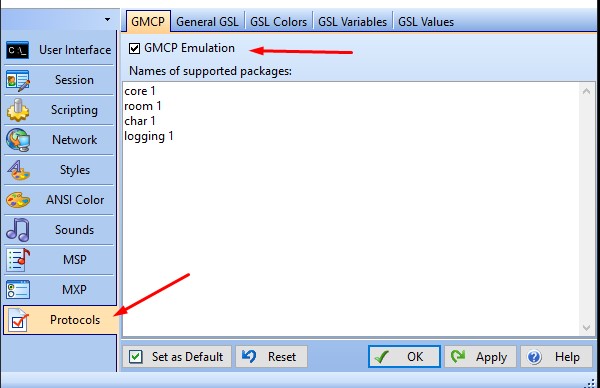
In the preferences, open the Protocols tab and ensure the GMCP Emulation checkbox is checked. Additionally, list the LegendMUD packages you want to receive in the textbox below. A list of packages can be found here.
Receiving a GMCP message[edit]
Once GMCP is enabled, the MUD will begin sending GMCP messages.
There are two types of GMCP messages, broadcasts and requested messages. Broadcast messages will happen automatically, while requested messages will only be sent by the MUD if the client requests them. The full list of packages and their message types can be found here.
CMUD automatically saves all data from GMCP messages in a global %gmcp variable.
For example, if you wanted to read the area name from the prompt, you can do this at any time, from anywhere via the following zScript:
%gmcp.char.prompt.an
Sometimes you need to be able to trigger off of a GMCP message. This can be done by creating a GMCP trigger.
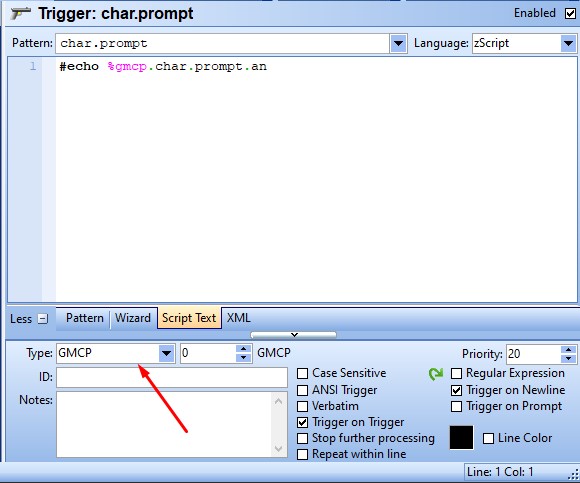
Create a new trigger and use the package name in the pattern field. Additionally, change the trigger type (noted in the screenshot below) to GMCP. The number field to the right of this dropdown can be ignored.
You can also use pattern matching to trigger on multiple GMCP messages.
For example, you can set the pattern to char.* to trigger on any character related GMCP message.
Sending a GMCP message[edit]
The MUD will not broadcast every message that is available. Some messages must be manually requested. Additionally, some broadcasted messages can also be requested if you need to refresh the data before the MUD would broadcast again.
The following script can be used to send a request to the MUD:
#SENDGMCP "Package.Subpackage" @Table
Where @Table is a normal CMUD database variable or string list with the data you want to send.
// As a database variable
$response = " "
#addkey $response client "CMUD"
#addkey $response version "3.22"
#SENDGMCP "core.hello" $response
// As a string list
$list = {core 1|char 1|room 1|comm 1}
#SENDGMCP "core.supports.set" $list
// With no data
#SENDGMCP "char.status" ""


